WPConvert Forms Setup Guide
Step-by-step guide to the WPConvert Forms plugin — detect forms at conversion, install from your theme, wire to CF7/WPForms/Gravity, and test submissions.
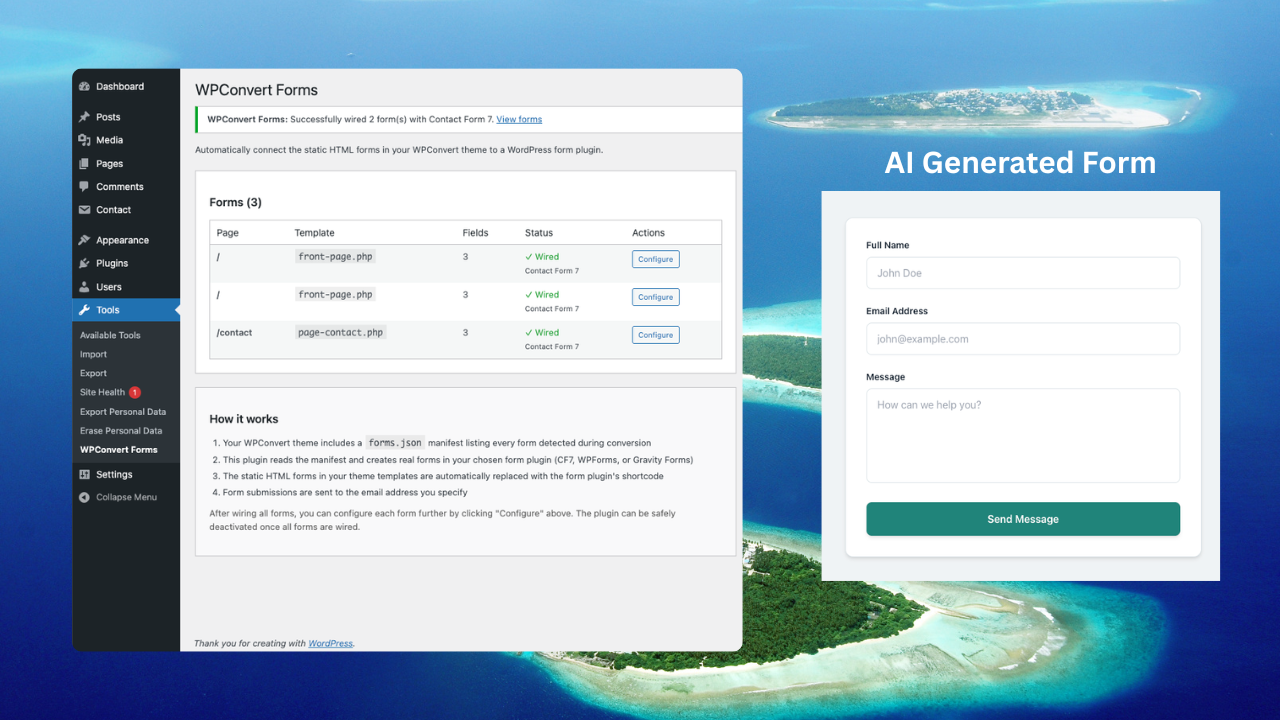
AI builders generate contact forms visually — but after conversion, those forms are usually front-end HTML with no backend. Submissions fail silently, emails never send, and there is no server-side validation.
The WPConvert Forms Plugin wires your converted form markup to a real WordPress form plugin (Contact Form 7, WPForms, or Gravity Forms) while preserving your original design.
This guide covers detection at conversion, installation, wiring, and testing.
When the Forms plugin is included
WPConvert bundles the Forms plugin in your theme download when forms are detected during conversion on PRO, Agency, and PAYG plans.
You will find:
plugins/wpconvert-forms.zipinside your theme ZIPassets/data/forms.json— manifest listing each form, its template file, and field definitions
Starter conversions capture forms as static HTML without the wiring plugin. Upgrade to Pro if you need working form submissions.
Why AI forms break after conversion
Most AI builders output forms as client-side HTML:
- No
wp_mail()or mail pipeline - No WordPress nonce verification
- No sanitization or server-side validation
- No connection to SMTP or form plugins
The WPConvert Forms Plugin adds backend handling by connecting your visible form to a real form plugin — without replacing your layout with a shortcode block.
How wiring works
- During conversion, WPConvert parses forms and writes
forms.jsonwith page, template file, field types, and labels. - When you wire a form, the plugin reads the manifest and creates a matching form in CF7, WPForms, or Gravity Forms with your recipient email.
- A hidden instance of the form plugin form plus a small bridge script is injected into the theme template.
- On submit, the bridge prevents the default submit, copies visible form data into the hidden form, and POSTs to the form plugin's API (e.g. CF7 REST endpoint).
- The form plugin handles nonce, validation, sanitization, and email. Success or error appears in your original form layout.
Your visible form keeps its HTML and CSS. Only submission is delegated.
Step-by-step setup
1. Convert with forms detected
Upload your AI-built site to WPConvert on a PRO, Agency, or PAYG plan. Confirm your export includes contact or signup forms. Download the theme ZIP after conversion completes.
2. Install the theme
Appearance → Themes → Upload Theme → activate your converted theme.
3. Install the Forms plugin
- Open your theme ZIP and locate
plugins/wpconvert-forms.zip. - Go to Plugins → Add New → Upload Plugin.
- Upload
wpconvert-forms.zip, install, and activate.
4. Install a form handler plugin
Install one of:
- Contact Form 7 (free)
- WPForms (Lite or Pro)
- Gravity Forms (commercial)
The WPConvert Forms Plugin creates forms inside whichever plugin you choose.
5. Wire your forms
- Go to Tools → WPConvert Forms.
- Set your recipient email for submissions.
- Choose your form handler (CF7, WPForms, or Gravity).
- Click Wire All Forms (or wire individual forms).
The plugin creates corresponding forms in your chosen handler and connects your theme forms to them.
6. Check what was created
Click Configure next to a wired form. It opens the form inside your handler plugin, and you should see one field per field on your page, already labelled from the page, plus a notification addressed to the recipient email you set in step 5.
If Configure opens an empty form with nothing but notification settings, the copy of the Forms plugin bundled in your theme predates version 1.4.3. Upload wpconvert-forms.zip from your theme's plugins/ folder again, then re-wire the form — forms wired by the older build were saved blank in the handler and need wiring a second time.
7. Test a submission
Visit the page with your contact form on the front end. Submit a test message. Confirm:
- Success or error message appears in your original form design
- Email arrives at your recipient address
- No console errors in the browser
If email fails, configure SMTP via your form plugin or a plugin like WP Mail SMTP — the Forms plugin routes through your chosen handler's mail pipeline.
Supported field types
WPConvert detects and wires common field types:
- Text, email, tel, url, number, date
- Textarea
- Select, checkbox, radio
- File upload
Custom or unsupported types may need manual adjustment in the form plugin after wiring.
A note on WPForms Lite
WPForms Lite ships text, textarea, select, radio, checkbox, email, name and number fields. Phone, website, date and file upload are WPForms Pro fields.
On Lite, those four are wired as text fields. Nothing is lost from the submission — every answer still reaches your inbox and your entries — but you do not get the native phone mask, date picker or upload widget. Install WPForms Pro before wiring if you want them, and the fields will be created with their proper types.
Contact Form 7 supports all of these types for free, so it remains the default handler.
Submission logging and CRM
- WPForms and Gravity Forms store entries in the database — view, export, and integrate with CRM tools inside those plugins.
- Contact Form 7 sends email by default; add-ons can add storage.
The WPConvert Forms Plugin sets up the form and recipient. Logging and CRM integrations are configured in the form handler you chose.
Troubleshooting
Form still does not submit
Confirm the Forms plugin is activated and forms are wired in Tools → WPConvert Forms. Check that your form handler plugin (CF7, etc.) is active.
Configure opens an empty form
Your theme's bundled Forms plugin is older than version 1.4.3, which saved WPForms forms blank. Re-upload wpconvert-forms.zip from your theme's plugins/ folder, then wire the form again. A correctly wired form shows one field per field on your page, with the labels from the page.
This also explains submissions that seem to send but never arrive: a blank form has no notification, so there was no recipient to mail. Re-wiring fixes both at once.
Email not arriving
Test WordPress mail with a simple CF7 form first. If default mail fails, install an SMTP plugin and configure it for your form handler.
Design looks wrong after wiring
Wiring injects a hidden form and bridge script — it should not change visible markup. If styling breaks, check for CSS that targets form globally. Re-wire from Tools → WPConvert Forms if you change form handlers.
Re-wire or change form handler
Open Tools → WPConvert Forms to wire again or switch between CF7, WPForms, and Gravity Forms.