WPConvert CPT Setup Guide
Step-by-step guide to the WPConvert CPT plugin — detection, opt-in activation, import, loop swap, and optional ACF or Meta Box field management.
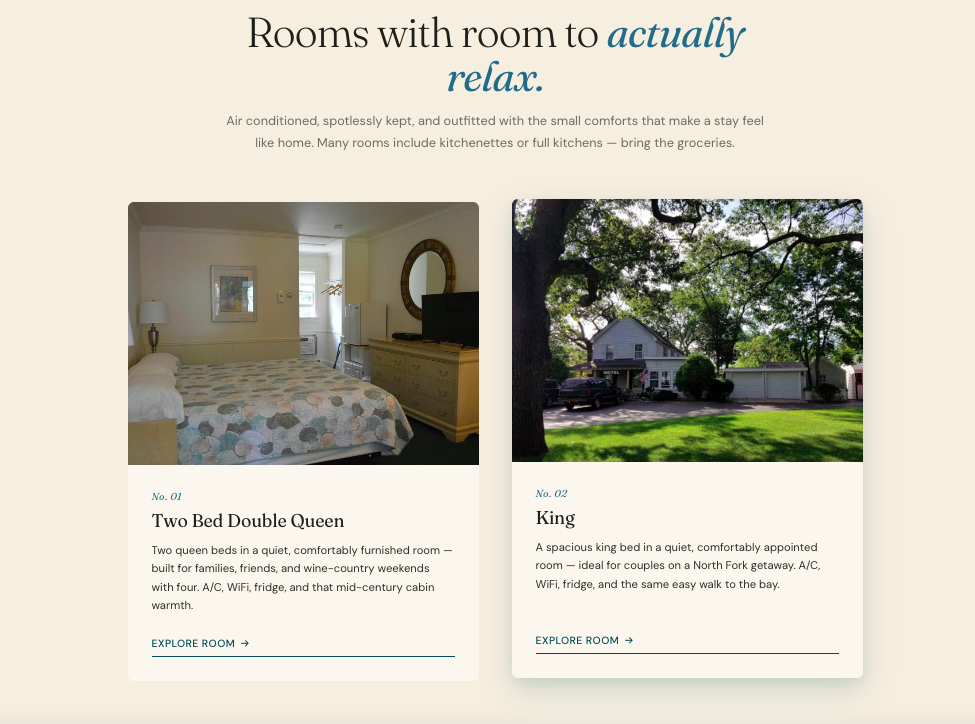
AI builders store card grids and listings as front-end data arrays — rooms, services, team members, portfolio items, and more. After a typical conversion, those arrays become hard-coded HTML in PHP templates with no wp-admin UI to add or edit items.
The WPConvert CPT Plugin detects repeating content during conversion and turns it into Custom Post Types you manage from WordPress admin — while your original card design, spacing, and breakpoints stay intact.
This guide covers detection, installation, activation, import, and optional ACF or Meta Box integration.
Note: Product catalogs flagged for WooCommerce follow the WooCommerce import guide instead of the CPT activation flow.
When the CPT plugin is included
WPConvert bundles the CPT plugin when repeating content is detected during conversion on PRO, Agency, and PAYG plans.
You will find:
plugins/wpconvert-cpt.zipinside your theme ZIPassets/data/cpt-candidates.json— manifest with field definitions, sample items, and section keys
Starter conversions capture repeating sections as static PHP templates. Upgrade to Pro for CPT detection and management.
What gets detected
The CPT candidate detector looks for:
- Top-level arrays of 3+ shape-similar objects in source files (TSX, JSX, TS, JS)
- Matching HTML grids stamped with
data-wpc-cpt-candidateanddata-wpc-cpt-item-templatemarkers
Common patterns: room/hotel listings, service grids, team member cards, portfolio items, testimonial cards, pricing tiers, FAQ entries.
Excluded: navigation menus, headers, footers, and product catalogs routed to WooCommerce import.
If your theme already has a native WordPress blog (WPCONVERT_NATIVE_BLOG), blog-shaped candidates are skipped — WordPress's built-in post type owns that content.
How the loop swap preserves design
At page render time, the CPT plugin's output-buffer loop swap:
- Finds stamped sections via
data-wpc-cpt-candidatemarkers - Replaces the static item template with a
WP_Queryloop over your CPT posts - Substitutes field values (title, image, description, custom meta) into the original card markup
- Preserves CSS classes, nesting, and responsive breakpoints
Your room cards look identical — they are powered by WordPress posts now.
If you deactivate a CPT, the front-end reverts to original static markup.
Step-by-step setup
1. Convert with repeating content detected
Upload your AI-built site on PRO, Agency, or PAYG. Download the theme ZIP after conversion.
2. Install the theme
Appearance → Themes → Upload Theme → activate.
3. (Optional) Install ACF or Meta Box
If you prefer a third-party field plugin over WPConvert's built-in edit panels:
| Option | Install |
|---|---|
| ACF | Advanced Custom Fields free or Pro |
| Meta Box Lite | Meta Box Lite — bundles Meta Box core + MB Builder |
| Meta Box + MB Builder | Meta Box core and MB Builder — both required |
Meta Box core alone is not enough — WPConvert needs MB Builder (MBB_VER) for the Meta Box opt-in checkbox.
Install field plugins before activating CPTs for the cleanest opt-in flow.
4. Install the CPT plugin
- Locate
plugins/wpconvert-cpt.zipin your theme ZIP. - Plugins → Add New → Upload Plugin → install and activate.
5. Activate CPTs (opt-in)
Look for the "WPConvert Custom Post Types Available" admin notice (or open Tools → WPConvert CPTs).
Click Activate on each CPT you want (e.g. room, service, team_member). Nothing changes on the front-end until you opt in.
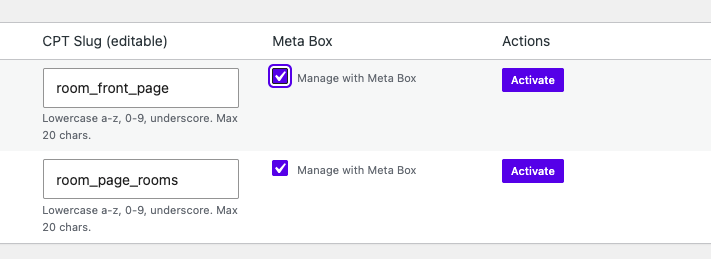
Optional per-CPT checkboxes when field plugins are active:
- Manage with ACF — auto-creates an ACF field group; hides WPConvert's built-in panel
- Manage with Meta Box — auto-creates an MB Builder field group; hides built-in panel
Only one field plugin per CPT. If both are selected, ACF takes priority.
6. Import detected items
From the admin notice or Tools → WPConvert CPTs, click Import to turn source array data into WordPress posts with images and meta populated.
7. Verify on the front end
Visit pages with card grids. Items should render from WP_Query. Add a new item in wp-admin — it should appear in the grid automatically.
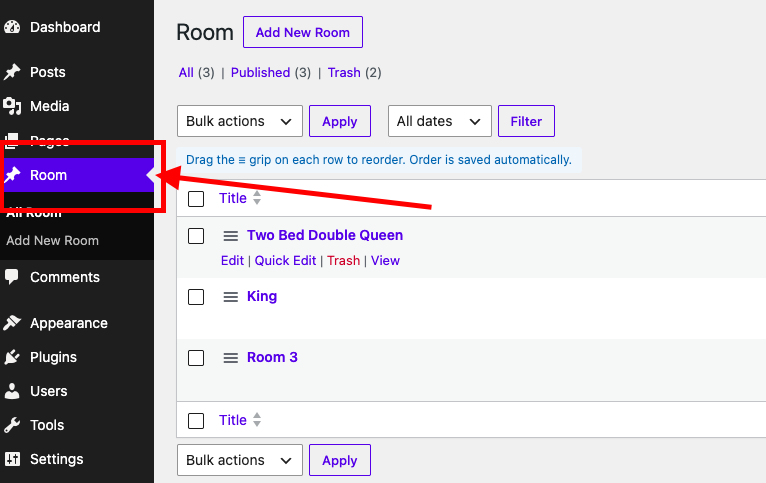
Managing content after import
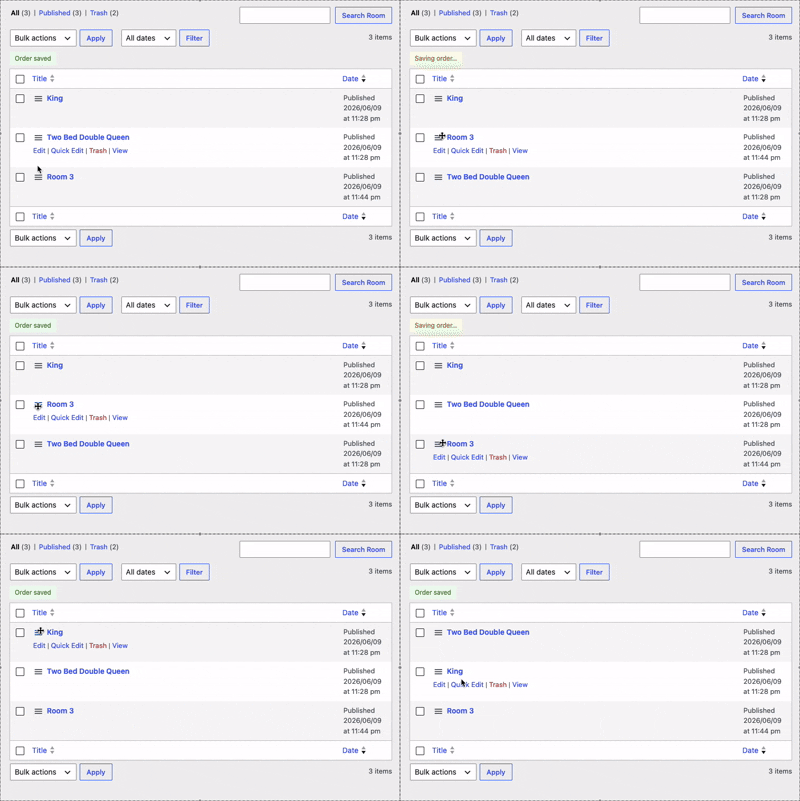
- Add items — standard WordPress post editor for each activated CPT
- Reorder — drag-and-drop on the post list screen (
menu_order); front-end grids respect order - Publish / draft / trash — standard WordPress workflows
- Homepage vs listing pages — WPConvert can register separate CPTs when compact preview grids and full listing pages use different layouts
Built-in edit panels
By default, WPConvert builds WordPress-native edit panels from the detected field schema:
- Text, long text, images, URLs, numbers, dates, select/enum fields
- No third-party field plugin required
ACF integration
When ACF is active and you check Manage with ACF:
- Auto-creates an idempotent ACF field group mapped from detected fields
- Reads values via
get_field()in the loop swap - Falls back to stored post meta if ACF is deactivated later

Meta Box integration
When Meta Box core + MB Builder are active and you check Manage with Meta Box:
- Auto-creates a DB-stored field group editable in MB Builder's Custom Fields UI
- Reads values via
rwmb_meta()in the loop swap - Falls back to built-in panels if Meta Box is deactivated later
Troubleshooting
Meta Box checkbox does not appear
Install MB Builder (or Meta Box Lite). Meta Box core alone does not include the visual builder WPConvert needs. Reload wp-admin after installing.
Layout breaks after activation
The loop swap should preserve card markup. If layout shifts, confirm you imported items — empty loops may collapse grids. Deactivate the CPT to revert to static markup while debugging.
CPT slug collision
If another plugin already owns a slug, WPConvert skips it rather than overwriting. Choose a different section or resolve the collision manually.
Product catalogs in CPT notice
Product catalogs with intent: woocommerce-product are never listed as CPTs. Use the WooCommerce import guide instead.