How to Add Pages and Sections to a Converted WordPress Theme
Already converted your AI-built site to WordPress and need to add a new page or section? You don't have to re-convert the whole project. Use WPConvert's Add a Page feature to install a brand-new page into your live theme, and follow our step-by-step instructions to add new sections to existing pages without breaking your layout.
Add new pages and sections to your live theme — without re-converting your whole site or breaking the layout.
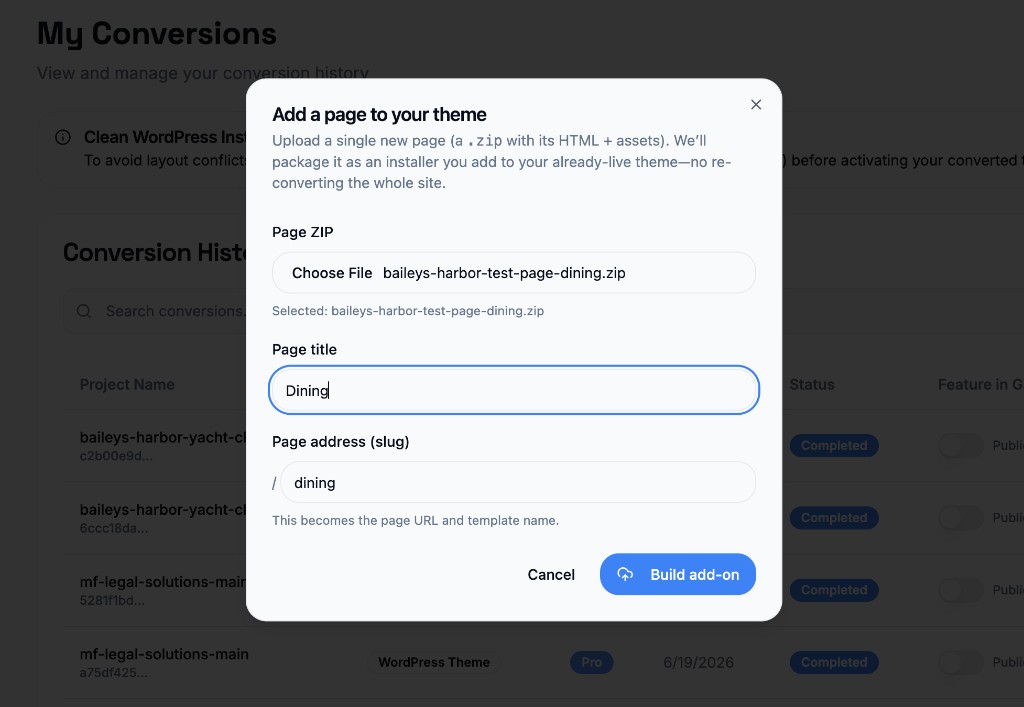
You converted your AI-built site to WordPress, launched it, and everything looks great. Then the inevitable happens: you need a new Pricing page, an extra Services section, or a seasonal Specials page. Re-converting the entire site to add one page feels like overkill — and risks overwriting edits you've already made.
You don't have to re-convert.
WPConvert now lets you add a single new page to an already-live theme with the Add a Page feature, and adding a new section to an existing page is a quick, layout-safe manual edit. This guide covers both.
Summary (TL;DR): To add a whole new page to a live WordPress theme (PRO, Agency, or PAYG), go to My Conversions → Add a page, upload a ZIP of the new page, and we generate a small WPConvert Page Importer plugin. Install it (Plugins → Add New → Upload Plugin), activate it, and the page is added automatically with a matching WordPress Page and page-scoped styles — your existing theme files are never overwritten. To add a new section to an existing page, edit that page's template (page-*.php) under Appearance → Theme File Editor, copy a sibling <section> so it inherits your theme's styling, and paste your new content. Then add either to your menu under Appearance → Menus.
Why You Shouldn't Re-Convert Just to Add a Page
Re-converting a finished site to add one page causes more problems than it solves:
- You lose post-launch edits. Any changes made with the WPConvert Editor, or directly in WordPress, live in your current install — a fresh conversion starts clean.
- It uses a conversion credit. A full re-conversion counts against your monthly quota; adding one page shouldn't.
- It risks menu and layout drift. Re-importing a whole theme can reshuffle menus and overwrite tweaks you made under Appearance.
- It's slow. You only changed one page — rebuilding the entire theme to ship it is wasted time.
The fix is additive, not destructive: add the new page (or section) on top of the theme you already have.
Option 1: Add a Whole New Page With "Add a Page" (PRO)
The Add a Page feature builds a single-page add-on for your existing theme. It's available on Pro and Agency plans (or with PAYG credits), and — importantly — adding a page does not use a monthly conversion.
What It Does
When you upload a new page's files, WPConvert:
- Generates a matching template for the new page using your theme's structure and class names, so it looks native.
- Scopes the new page's CSS to that page, so adding it can't change the styling of any other page on your site.
- Builds a small importer plugin (the WPConvert Page Importer) that installs the template, assets, and a WordPress Page for you.
- Stays additive — it never overwrites or modifies your existing theme files. If anything looks off, you simply deactivate the importer plugin.
How to prepare your page ZIP
Before you upload, pack the rendered page — not a lone source file. This applies whether your site came from an AI builder, a code editor, or a static export.
Recommended (most reliable)
- Open the finished page in your browser (preview, live URL, or local dev server).
- Save or export so you have the HTML file and its assets (CSS, JS, images) in one folder.
- Name the main file
index.htmlif it is the only page in the zip. - If you used browser Save Page As, zip both the
.htmlfile and its companion_filesfolder — not the assets folder alone.
Also works — full project export
You can upload a complete React/Vite/Next.js project zip (with package.json), the same as a normal conversion. We snapshot the app's entry route — usually the homepage. The slug you enter sets the WordPress URL only; it does not choose which in-app route gets rendered. If your new page is not the homepage, use the static HTML export approach above.
Won't work on its own
- A single component or page source file (e.g. one
.jsxor.tsxfile) - Images or CSS with no HTML page
- Only the assets /
_filesfolder (missing the.htmlfile)
Step-by-Step: Add a Page
- Prepare the new page as a ZIP using the guide above.
- Open your dashboard and go to My Conversions.
- Click "Add a page." Upload the page ZIP, give the page a title, and set its address (slug) — for example,
pricingbecomesyoursite.com/pricing. - Download the generated importer. WPConvert builds and hands you the WPConvert Page Importer plugin ZIP for that page.
- Install the importer in WordPress. Go to Plugins → Add New → Upload Plugin, upload the ZIP, and click Install Now.
- Activate the plugin. On activation, the importer adds the new page template, its scoped assets, and a matching WordPress Page automatically.
- Add it to your menu. Go to Appearance → Menus, add the new page to your navigation, and save.
That's it — the new page is live, styled to match, and your existing pages are untouched.
Why "Add a Page" Is Layout-Safe
The importer is additive by design:
- It never edits your existing theme files — the new page lives alongside them.
- The new page's styles are scoped to that page only, so global CSS and other pages can't shift.
- You can deactivate the importer plugin at any time to cleanly remove the add-on.
Tip: Adding a page is ideal for post-launch additions like a new landing page, a campaign page, or a service you didn't have at conversion time — without spending a conversion credit or risking your live design.
Option 2: Add a New Section to an Existing Page (Manual)
Adding a section to a page you already have is a manual edit, not an automated feature — but it's quick and safe when you reuse your theme's existing markup. The WPConvert Editor changes existing text, images, links, and buttons in place; it does not insert brand-new sections. To add one, you edit the page template.
There are two reliable approaches.
Method A — Edit the Page Template (Most Reliable)
This is the recommended way because it guarantees your new section inherits the theme's exact styling.
- In WordPress, go to Appearance → Theme File Editor (or connect via SFTP for a safer workflow).
- Open the relevant page template — for example,
page-amenities.phporpage-about.php. The file name matches the page's slug. - Find an existing
<section>near where you want the new content to appear. - Copy that entire sibling
<section>block — including its wrapper<div>s and class names — and paste it where you want the new section. - Replace the copied text, images, and links with your new content. Because you reused the existing class names, spacing, fonts, and colors carry over automatically.
- Save the file and reload the page to confirm.
Why copy a sibling section? Your converted theme's styling is driven by class names. Starting from a real section that's already on the page means the new block inherits the same padding, typography, grid, and responsive breakpoints — so it matches instantly instead of looking out of place.
Method B — Use a Block Area or Page Builder (Code-Free)
If you'd rather not touch PHP, add an editable content area to the template once, then build visually.
- In the page template (
page-*.php), add a WordPress content area where you want editable sections to appear:
<?php while ( have_posts() ) : the_post(); ?>
  <?php the_content(); ?>
<?php endwhile; ?>
- Save the template, then open that page under Pages → Edit in WordPress.
- Use the WordPress block editor (Gutenberg) — or a builder like Kadence or GreenShift — to add and arrange new sections in the content area.
- Publish. New sections now render inside the area you added, while the rest of the template stays exactly as converted.
A Safer Way to Edit Templates
Editing files directly in Theme File Editor works, but a syntax error can take a page down. For safety:
- Back up the template first — copy the file's contents into a local text file before editing.
- Prefer SFTP or your host's file manager so you can revert instantly if needed.
- Test on staging if you have it, then copy the change to production.
Add a Page vs. Add a Section — Which Should You Use?
| Goal | Use | Automated? | Plan |
|---|---|---|---|
| A brand-new page (new URL) | Add a Page feature | Yes — generates an importer plugin | PRO / Agency / PAYG |
| New content block on an existing page | Edit the page template (copy a sibling <section>) |
No — manual edit | Any plan |
| Editable areas for non-technical updates | Add the_content() + block editor |
Partly — one-time template edit | Any plan |
| Changing existing text, images, links, buttons | WPConvert Editor (no new sections) | Yes — front-end editing | Any plan (more on PRO) |
Rule of thumb: new page → use Add a Page. New section on a page you already have → copy a sibling section in the template.
After Adding: Wire It Into Your Site
Whether you added a page or a section, finish with these steps so visitors can find it:
- Add to navigation. Go to Appearance → Menus, add the new page (or an anchor link to the new section) to the right menu, and save.
- Check internal links. Link to the new page from related existing pages to help users and search engines discover it.
- Review SEO. Open the new page under Pages → Edit once so Yoast SEO or Rank Math seed the title, meta description, and focus keyphrase. (See our Yoast & Rank Math compatibility guide.)
- Test responsiveness. Confirm the new content looks right on mobile — reusing existing section markup keeps breakpoints consistent.
FAQ
Do I need to re-convert my site to add a page?
No. The Add a Page feature builds an importer plugin that installs a single new page into your already-live theme. Your existing theme files and edits are never overwritten, and it doesn't use a monthly conversion credit.
Is "Add a Page" available on the Starter plan?
Adding a page is a PRO and Agency feature (also available with PAYG credits). Starter conversions don't include the Add a Page workflow — upgrade to PRO to add pages post-launch.
Will adding a page change the styling of my other pages?
No. The new page's CSS is scoped to that page only, so global styles and other pages are unaffected. The importer is additive and can be deactivated cleanly if needed.
Why can't the WPConvert Editor add a new section for me?
The WPConvert Editor is designed for layout-safe content edits — it changes existing headings, text, images, links, and buttons in place without rewriting your HTML structure. Inserting a brand-new section means adding new markup, which is done by editing the page template so it inherits your theme's exact styling.
How do I make sure my new section matches the theme?
Copy an existing sibling <section> from the same template and replace its content. Because your theme's styling is driven by class names, reusing them means the new section inherits the same spacing, fonts, colors, and responsive behavior automatically.
Can I add a section without editing PHP?
Yes. Add a WordPress content area (the_content()) to the page template once, then use the block editor or a builder like Kadence or GreenShift to add sections visually under Pages → Edit.
Does adding a page use one of my monthly conversions?
No. Adding a page is a separate, additive action and does not count against your monthly conversion quota.
What should I put in the page ZIP?
Zip the rendered HTML and assets for that one page — not a single source file (e.g. one .jsx component). Open the page in your browser, save or export it, and include the .html file plus CSS, JS, and images. If you used browser Save Page As, zip both the .html file and its _files folder together.
You can upload a full app/project zip, but we usually capture the entry route (homepage). The slug sets the WordPress URL only — if your new page is a sub-route in a multi-page app, export that page as static HTML instead.
What if the new page looks wrong after import?
Because the importer is additive and never overwrites your theme, you can simply deactivate the WPConvert Page Importer plugin to remove the add-on, then adjust the page ZIP and try again.
Grow Your Site Without Starting Over
Your WordPress site should grow with your business — without forcing a full re-conversion every time you need a new page or section.
- Add a Page installs a brand-new, styled page into your live theme in minutes (PRO / Agency / PAYG).
- Adding a section is a quick, layout-safe template edit — copy a sibling
<section>and replace its content.
Both keep your existing design and edits intact.
- Start Converting — Convert your AI-built site and unlock post-launch page add-ons on PRO.
- See How It Works — Step-by-step instructions for adding pages and sections in the dashboard (Edit My Theme).
Further Reading
- Introducing the WPConvert Edit Plugin — Edit text, images, links, and buttons on your live site without breaking the layout.
- Introducing the WPConvert Forms Plugin — Wire AI-generated forms to Contact Form 7, WPForms, or Gravity Forms.
- Introducing the WPConvert CPT Plugin — Turn repeating content into Custom Post Types you can manage from wp-admin.
- WPConvert Themes Now Work With Yoast SEO and Rank Math — Feed your real page content to SEO analysers and pre-fill snippets.
- Convert Lovable to WordPress — Turn Lovable.dev exports into installable WordPress themes.